Saturday, November 24, 2018

How to Use Mail Merge

Mail Merge allows a user to create, and easily combine a letter with a mailing list, thus creating individual letters for each person on the mailing list. To begin the user should type the letter that needs to be merged (I insert an "I" in the line that will later contain the inside address, and a "G" in the line that will be used for the greeting). After the letter is typed, click the MAILINGS tab, then click the Select Recipients button to choose who the letter needs to be addressed to.


Clicking Type a New List will open the New Address List box, from there a user can add the information for receivers of the letter.


Next the user should click in the line of the letter that will hold the Inside Address (delete anything that was inserted to mark the line) and click Address Block on the MAILINGS tab. In the Insert Address Block box the user can customize the layout of the inside address.


After inserting the Address Block, the user should follow the same steps to insert the Greeting Line in the proper location. The Insert Greeting Line dialog box contains the options available to customize the letter's greeting.


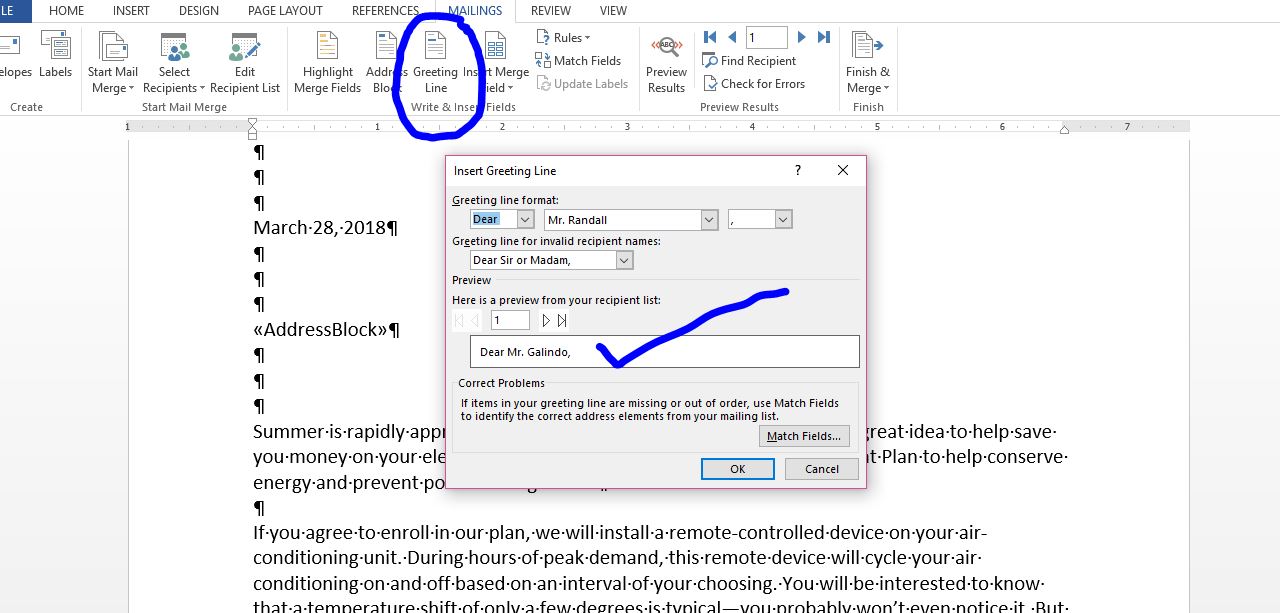
The following is an example of the address and greeting fields after the insertion is complete.


The user can preview each individual result by clicking Preview Results, and then using the record selectors located in the Preview Results section of the MAILINGS tab.


To complete the Mail Merge the user should click Finish & Merge, and choose one of the three options listed.


By choosing Edit Individual Documents, the user merges the letter with the mailing list, and has the opportunity to proofread and/or edit each individual letter.


The completed Mail Merge opens as a new document with a personally addressed letter for each person on the mailing list.


Mail Merge can also be used to create printed envelopes for each individual letter.


Or, the user can create custom mailing labels with Mail Merge, using a variety of label brands, types, and sizes.


Mail Merge is a must for anyone that sends the same information to a variety of people.

How to Insert a Textbox

If a user wants to highlight or draw attention to certain text in a document, perhaps a pamphlet or brochure, a textbox would probably be the best option to use.

To insert a textbox click on the INSERT tab and then click the textbox button to see the list of available options. Click the textbox of your choice, or select Draw Textbox to freestyle your textbox.


The user can then completely customize the text inside the textbox.


There is also a large selection of options available to customize the actual textbox.


Anytime you need to draw attention to a section of text consider a textbox. You may be pleasantly surprised by the results.


Saturday, November 10, 2018

Word Templates

A template is defined as a preset format for a document or file, used so that the format does not have to be recreated each time it is used. Word has templates for everything from a Business Memo to a Grocery List. When a user opens a new document in Word, a selection of available templates is displayed. A user can then choose one of those templates, or type a suggestion into the search box.


Templates are mainly used for documents that are made frequently, or if the user is unsure of how the document is formatted. For example, if an office employee has to make memos often he or she may use a template to speed up the process. Templates are able to be fully customized. Titles, headings, text, and images are all able to be changed, added to, removed, or rearranged as the user sees fit. To change the text in a template the user must first highlight the text that needs to change, and then simply type in the replacement text, or press delete if the text is not needed.


There is a template for almost any type of document that a user would be interested in creating. There is a template for a customized Calendar.


There are templates for many different types of Resumes.


There are templates to help with Home Safety.


There are templates for Chores and Organization.


A user can even create his or her own template such as a Letterhead. To create a template simply select one of the template choices under Save As File Type in the Save As dialog box.


A blank custom letterhead will open when the user selects the template that he or she created.


With all of the template choices available a user does not need to create every document from scratch.

Saturday, November 3, 2018

Quickly Change Uppercase, Lowercase, and Title Case

Uppercase is when all of the letters in a word are capitalized, lowercase is when all of the letters in a word are not capitalized, and title case is when only the first letter of every word is capitalized. These three options are available to scroll through as a keyboard shortcut by pressing SHIFT+F3. If a Word user is typing a document and erroneously types a word in the wrong case he or she could simply press SHIFT+F3 immediately after typing the word to toggle through the three different case options. If users are past the words that they want to change the case of, then they can highlight the words to change with the mouse and then press SHIFT+F3 until the words are in the case that they desire.


In the example, the words "Treasure Island" are changed using this method.

Friday, October 26, 2018

The How, Where, and Why of Reference Initials

Reference initials are used to identify the writer, signer, and/or typist of a document. Reference initials are typed in all lowercase or all uppercase at the bottom left side of a document. If the writer and signer are the same person then that person's name is usually typed in the closing of the document, and only the initials of the typist are listed.


In some cases a document is signed, written, and typed by three different people. In that case, typically the signer's name is typed in the By line of the document. The document would then have the initials of the writer and the typist, separated by a colon, on the bottom left side. For example, the following document is signed by Dr. Freidman, written by the doctor's assistant--Carrie Garrison, and typed by the secretary--Jane Smith.


How is a Tab Different from a First-Line Indent

Indents are used for different things in Word. Some indents are set by the user to make the text align in a particular way, and some indents are set automatically as part of a Word function. For example, Word uses indents to perform the Bullet and Number functions.


To set an indent the user would adjust the settings in the Paragraph dialog box on the Indents and Spacing tab.


From here a user can set Special indents like a First-line or Hanging indent. Hanging indents are often used in Bibliographies and Works Cited pages for reports. A Hanging indent allows the first line of text to "hang" over to the left of the subsequent lines of text in a paragraph, and by pressing ENTER the user will begin a new paragraph with the first line hanging.


First-line indents are used to notify the reader that a new paragraph is beginning. If a user sets a first-line indent in Word, then every time the user presses ENTER to begin a new paragraph the first line will automatically indent .


Like indents, tabs are used to align text in a particular way, but the user must press the TAB key to use a tab. If the user presses TAB to indent the first line of a paragraph Word automatically adds a first-line indent to the ruler, with the auto correct options box available to change the indent back to a tab.


Tabs can also be adjusted to the users specifications by using the Paragraph dialog box, and clicking the TABS button in the bottom, left side of the box.


Saturday, October 13, 2018

How to Make International Telephone Calls

To make international phone calls a user must know the receiving countries International Direct Dialing (IDD) code and the country code for that country, in addition to the area code and telephone number. First the user would dial the IDD code, then the country code, then the area code (if any), and last the phone number is dialed.


So, to call Mexico from the U.S. the user must dial: 01152 and then the area code and phone number, or to call the U.S. from Mexico the user would dial 981 and then the area code and phone number. For example, if a user wanted to call Time & Temperature in Lawrenceburg, TN, USA from Taiwan they would dial 00219317627888.

How to Use Mail Merge

Mail Merge allows a user to create, and easily combine a letter with a mailing list, thus creating individual letters for each person on the...